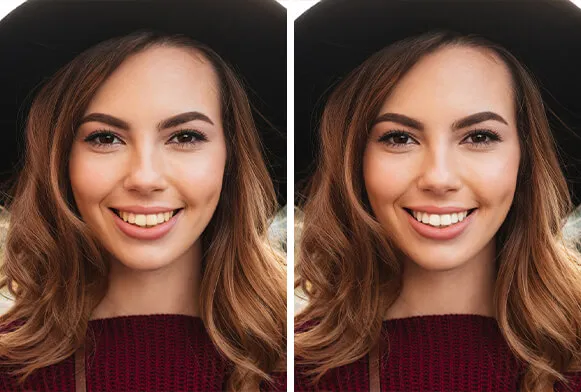
In today’s digital age, having a dazzling smile is easier than ever, thanks to photo editing software. Adobe Photoshop Express offers a convenient and accessible solution for teeth whitening, empowering users to enhance their smiles quickly and effortlessly. This guide delves into how to whiten teeth using Photoshop Express, providing a step-by-step tutorial and valuable tips for achieving natural-looking results. Whether you’re looking to touch up a selfie or perfect a professional portrait, Photoshop Express provides the tools you need to make your teeth appear brighter and more appealing. Let’s explore the power of this tool and how it can transform your photos.
Why Use Photoshop Express for Teeth Whitening
Photoshop Express is a great choice for teeth whitening, offering several advantages over more complex software. Its simplicity and ease of use make it accessible to everyone, from casual users to aspiring photographers. Furthermore, Photoshop Express is a mobile-friendly application, available on both Android and iOS devices, enabling you to edit photos on the go. The ability to quickly correct and enhance photos with user-friendly tools ensures that your pictures look their best. You can quickly remove imperfections, adjust colors, and apply a wide range of other enhancements, making it a versatile tool for all your photo editing needs.
Benefits of Using Photoshop Express
Photoshop Express stands out for several reasons, making it an excellent choice for teeth whitening. The app is very useful and the benefits are worth to consider for anyone. It’s perfect to edit your photos and make them ready for your social media account. Here are some advantages of using Photoshop Express.
User-Friendly Interface

The app’s interface is designed to be intuitive and easy to navigate, even for those new to photo editing. Key features are readily accessible, and the learning curve is minimal, allowing you to start whitening teeth immediately without extensive training. The clear layout and straightforward tools make it a pleasure to work with, saving time and frustration, and allowing you to achieve professional-looking results with ease. You will feel the simplicity right away!
Free to Use
One of the most attractive features of Photoshop Express is its free availability. The basic tools needed for teeth whitening are accessible without any subscription fees. This makes it an affordable option for anyone wanting to enhance their photos. While there are premium features available through in-app purchases, the free version provides ample functionality for achieving excellent teeth whitening results.
Quick Results
Photoshop Express is designed for speed and efficiency. The teeth whitening process can be completed in a matter of minutes. This is especially useful when you’re on the go or need to quickly edit photos for social media or sharing with friends and family. The instant results enable you to see the impact of your edits in real-time, allowing you to adjust settings as needed until you achieve the desired outcome.
Step-by-Step Guide to Teeth Whitening in Photoshop Express

Whitening your teeth in Photoshop Express is a straightforward process. This guide will walk you through each step, ensuring you achieve the best possible results.
Open and Import Your Photo
Launch the Photoshop Express app on your device and select the photo you wish to edit. You can import images from your device’s gallery, cloud storage, or directly from social media platforms. Once the image is open, you’re ready to begin the teeth whitening process.
Access the Healing or Spot Removal Tool
Photoshop Express offers several tools that can be used for teeth whitening. The primary tool is often the ‘Healing’ or ‘Spot Removal’ tool, which can be found in the ‘Retouch’ or ‘Adjustment’ section of the app. This tool allows you to carefully select and modify specific areas of the image. It is also a very important step.
Select the Teeth and Whiten

Use the selection tool to carefully outline the teeth in your photo. The Healing or Spot Removal tool enables you to adjust the color and brightness of the selected area. To whiten the teeth, gently brush over the teeth with the tool, adjusting the size and intensity as needed to cover the surface of the teeth. Make sure you’re not overdoing it for the best results.
Adjust the Intensity
The intensity of the whitening effect can be controlled through sliders or adjustment settings within the tool. Start with subtle adjustments and gradually increase the whitening effect until you achieve the desired brightness. It’s important to maintain a natural look; therefore, avoid excessive whitening that can make the teeth appear artificial.
Refine and Touch-Up
After the initial whitening, review the image and make any necessary refinements. Pay attention to areas that might require additional touch-ups, such as uneven whitening or areas where the tool may have accidentally affected the surrounding gums or skin. You can use the Eraser tool to fine-tune your adjustments. The details are the most important part for the result.
Save and Share Your Image

Once you are satisfied with the results, save the edited photo to your device. Photoshop Express allows you to save in various formats and resolutions. You can also directly share your edited photos on social media platforms like Instagram, Facebook, and others. This allows you to easily showcase your enhanced smile to friends and family. You may also use it for your business.
Tips for Natural-Looking Teeth Whitening
Achieving a natural look is crucial for successful teeth whitening in Photoshop Express. Over-whitening can result in unnatural results that can be easily spotted. It is important to use your best judgment to achieve the most natural results. Here are some tips to help you avoid common pitfalls and achieve a natural look.
Avoid Over-Whitening
The most common mistake is over-whitening. Always start with subtle adjustments and gradually increase the brightness. Avoid making the teeth appear too bright compared to the surrounding skin and overall lighting of the photo. If the teeth are significantly brighter than the rest of the image, the result will look artificial.
Consider Lighting

Lighting plays a critical role in how natural the whitening appears. Pay attention to the lighting in the original photo. If the photo is taken in a warm or yellow-toned light, avoid making the teeth appear stark white. Instead, try to match the color of the teeth to the overall lighting environment. This will ensure a more realistic outcome.
Match the Tone
Ensure that the tone of the teeth matches the surrounding areas of the face. Use the color selection tools or the eye-dropper to sample colors from other areas, such as the whites of the eyes, to ensure that the teeth blend in seamlessly. The goal is to enhance the smile without creating a noticeable difference in color.
Other Photoshop Express Features
Photoshop Express offers a range of tools beyond teeth whitening that can help you enhance your photos. These features are very important to help you with your photo editing and make them stand out.
Enhance and Edit Your Photos
Besides teeth whitening, you can use Photoshop Express to enhance other aspects of your photos. Adjust exposure, contrast, highlights, and shadows to improve the overall look of the image. You can also correct colors and apply sharpening to bring out details.
Remove Blemishes and Imperfections
Use the Healing Brush or Spot Removal tool to eliminate blemishes, acne, and other imperfections on the skin. This can improve the overall appearance of the portrait. These tools are particularly helpful for cleaning up skin in portraits, making the subject’s face appear flawless.
Add Filters and Effects
Photoshop Express provides a wide variety of filters and effects to change the look and feel of your photos. You can apply stylistic filters, adjust the color grading, and add creative effects. These options allow you to give your photos a unique look and feel, making them stand out.
In conclusion, Photoshop Express is a powerful and user-friendly tool for teeth whitening. With its intuitive interface and range of editing capabilities, you can quickly enhance your photos and achieve a more radiant smile. By following the steps outlined in this guide, and keeping in mind the tips for natural-looking results, you can make the most of this fantastic app and achieve stunning photo edits that will leave a lasting impression.