Understanding DIY Teeth Whitening Strips
DIY teeth whitening strips offer a budget-friendly approach to brighten your smile from the comfort of your home. These homemade solutions often utilize common household items and ingredients to achieve a whitening effect. However, it’s crucial to understand that the effectiveness and safety of these methods can vary significantly. While some DIY methods can provide noticeable results, others may be less effective or even pose potential risks to your dental health. Therefore, it’s essential to approach DIY teeth whitening with realistic expectations and a good understanding of the process involved, as well as its potential consequences. Before you begin any DIY whitening treatment, it’s also a good idea to consult with your dentist to ensure it’s a suitable option for your specific dental needs and to avoid any complications.
The Science Behind Teeth Whitening
Teeth whitening works by utilizing bleaching agents to break down the stains and discoloration present on the enamel surface of your teeth. These stains can be caused by a variety of factors, including food, drinks, tobacco use, and aging. The active ingredients in most whitening products, such as hydrogen peroxide or carbamide peroxide, penetrate the enamel and dentin to oxidize the stain molecules. This process essentially lightens the color of the teeth, resulting in a brighter smile. The effectiveness of teeth whitening depends on the concentration of the bleaching agent, the duration of the treatment, and the individual’s tooth structure and the type of stains present. Professional whitening treatments administered by a dentist often use higher concentrations of bleaching agents and can provide faster and more dramatic results. Understanding these basic principles helps set realistic expectations for the results of DIY teeth whitening methods.
Benefits of Using DIY Whitening Strips

One of the main advantages of DIY teeth whitening strips is the cost-effectiveness. Compared to professional whitening treatments or even over-the-counter products, making your own strips can save you a significant amount of money. Another benefit is the convenience. You can create and use these strips at any time and in the comfort of your home, eliminating the need for appointments or travel. DIY methods also allow you to control the ingredients and the treatment duration, allowing for more customization based on your sensitivity levels and desired results. This control can be particularly appealing to those who are cautious about using harsh chemicals or prefer a more natural approach to teeth whitening. Finally, DIY teeth whitening offers the satisfaction of achieving results through your own efforts, which can be very rewarding. This is especially true if you are looking for a quick solution to make your teeth look better without having to spend a lot of money.
Drawbacks of DIY Whitening Strips
While DIY teeth whitening strips can be appealing, there are potential drawbacks to consider. The effectiveness of homemade whitening treatments can be inconsistent, and the results may not be as dramatic or long-lasting as professional methods. It’s difficult to achieve the same level of whitening as with professional treatments, where the concentration of the whitening agents is controlled to be more potent. Another concern is the potential for sensitivity or damage to your teeth and gums. Some DIY recipes may contain abrasive ingredients that can erode the enamel, leading to increased sensitivity and potential long-term damage. Improper application or overuse can also cause irritation and inflammation. Furthermore, the quality and purity of the ingredients used in DIY methods are not always guaranteed, which can pose health risks. It’s important to research ingredients thoroughly and be cautious about any potential side effects.
Essential Materials for DIY Strips
Creating DIY teeth whitening strips requires a few basic materials that you likely already have at home. The main component is often the whitening agent itself, such as baking soda or hydrogen peroxide. Aluminum foil, which can be easily shaped to the teeth and help hold the whitening agent in place, is a common material. You will also need a small bowl or container for mixing the ingredients and a soft-bristled toothbrush to apply the mixture. Some people also like using a measuring spoon to ensure accurate measurements of the ingredients. Optionally, you can use a small mirror to make sure you are applying the strips accurately and a timer to track the whitening duration. These materials are readily available and usually inexpensive, making it easy to start your DIY whitening project without needing to invest much.
Ingredients for DIY Whitening Strips

The ingredients used in DIY teeth whitening strips are typically simple and safe for most people. Baking soda is a popular choice due to its mild abrasive properties, which can help remove surface stains. When used correctly, baking soda can help brighten your teeth. Hydrogen peroxide, another common ingredient, is a mild bleaching agent that can help break down stains. It’s important to use the correct concentration of hydrogen peroxide (usually 3%) to minimize the risk of gum irritation and sensitivity. Some recipes also include a small amount of lemon juice, but it’s important to use this sparingly, as the high acidity can erode enamel over time. Coconut oil is sometimes added for its anti-inflammatory and antibacterial properties. Always research the ingredients and be sure to use them safely. Consult with your dentist if you have any concerns or any allergies.
Step-by-Step Guide to Making DIY Strips
Here is a step-by-step guide on how to make DIY teeth whitening strips. Begin by gathering all the necessary materials and ingredients. In a small bowl, mix the whitening agent – typically baking soda with a small amount of hydrogen peroxide – until you get a consistent paste. Make sure the paste isn’t too runny or too thick. Prepare the aluminum foil by cutting strips that are wide enough to cover your teeth. Gently prepare your teeth by brushing them gently with water, but make sure you don’t use toothpaste. Apply the paste to the front side of the foil strips. Place the foil strips over your teeth, ensuring they cover the front surfaces completely. Gently press the foil against your teeth, making sure it adheres well. Leave the strips on for the recommended time. Once the time is up, carefully remove the foil strips and rinse your mouth thoroughly with water. Avoid swallowing any of the mixture. Make sure to brush your teeth gently with a regular toothpaste and avoid using harsh brushing techniques.
Preparing the Teeth
Before applying any DIY teeth whitening strips, it’s crucial to prepare your teeth for the process. The main goal is to remove any surface debris or food particles that could interfere with the whitening agent’s effectiveness. Begin by gently brushing your teeth with water to remove any loose particles. Avoid using toothpaste at this stage, as it can create a barrier and reduce the contact between the whitening agent and your teeth. Floss your teeth to remove any debris from between your teeth. This ensures that the whitening agent can reach all surfaces. It’s also beneficial to rinse your mouth with water to further clean your teeth. It is also crucial that your teeth are dry when you apply the whitening agent. Ensure they are completely dry so that the strips can stick properly. Preparing your teeth properly maximizes the effectiveness of the DIY whitening treatment and helps to ensure a more even whitening result.
Applying the Whitening Paste

After preparing your teeth, the next step is to apply the whitening paste to your teeth. Using a soft-bristled toothbrush or a clean finger, carefully apply the prepared paste evenly across the front surfaces of your teeth. Make sure all the visible parts of your teeth are covered, paying attention to areas with more noticeable staining. Be careful not to apply too much paste, as this can lead to dripping or discomfort. The amount of paste needed will depend on the size of your teeth, but a thin, even layer is generally sufficient. Once you have applied the paste, make sure to avoid touching your gums, as the whitening agents can cause irritation. The proper application ensures that the teeth are thoroughly exposed to the whitening solution for the best possible results. Careful application will also help to minimize any potential side effects like sensitivity or gum irritation, enhancing the comfort of your experience.
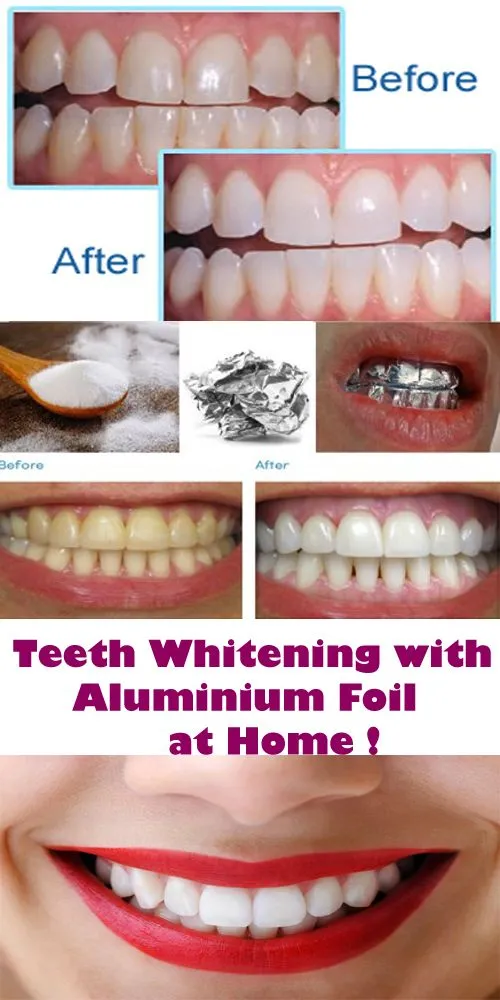
Using the Aluminum Foil
Aluminum foil plays a crucial role in enhancing the effectiveness of DIY teeth whitening strips. Once the whitening paste has been applied to your teeth, the aluminum foil is used to cover the teeth completely. Aluminum foil acts as a barrier, holding the whitening agent in place and ensuring it has close contact with your teeth. The foil helps to create a more enclosed environment, which helps the agent to work more efficiently. Carefully shape the foil to fit your teeth, ensuring that it covers the entire surface of the paste-covered areas. Gently press the foil against your teeth, taking care to avoid contact with your gums. The foil’s flexibility allows it to mold around the teeth, creating a snug fit. By using aluminum foil in this way, you optimize the contact time and ensure the whitening agent has the best chance to perform. The foil is an easy and inexpensive tool which is an integral part of the DIY whitening process.
Whitening Time and Procedure
The duration of the whitening process is a crucial aspect of DIY teeth whitening with foil. Once the aluminum foil strips have been placed, it’s important to keep them on for the recommended time. The standard time for the strips to be left on your teeth varies, usually it is between 5-10 minutes. It is important to monitor your teeth for any signs of sensitivity or irritation. If you feel any discomfort, remove the strips immediately. Avoid leaving the strips on for too long, as this can increase the risk of enamel erosion and gum irritation. When the time is up, carefully remove the foil and gently rinse your mouth with water to remove any residue. It is essential to follow the recommended time guidelines to achieve the best results while minimizing the risk of any potential side effects. Consistency and adherence to the procedures will help you achieve the smile you desire.
Post-Whitening Care

Proper post-whitening care is essential to maintain the results of your DIY teeth whitening efforts and to protect the health of your teeth. After removing the strips and rinsing your mouth, brush your teeth gently with fluoride toothpaste. This will help to remineralize the enamel and strengthen your teeth. It’s a good idea to avoid consuming strongly colored foods and drinks, such as coffee, tea, red wine, and berries, for at least a few hours after whitening, as your teeth may be more susceptible to staining during this time. Using a straw for drinks can help minimize contact with your teeth. Additionally, be sure to stay hydrated by drinking plenty of water, which helps to rinse away any remaining whitening agents and keeps your mouth moist. Regular dental check-ups are also important for maintaining oral health and monitoring the effects of the DIY whitening treatments. Following these post-whitening care tips can help extend the life of your whiter smile and keep your teeth healthy and strong.
Rinsing and Cleaning the Teeth
Proper rinsing and cleaning are critical steps after using DIY teeth whitening strips. Once the recommended whitening time is complete and the foil has been removed, rinse your mouth thoroughly with water to remove any residual whitening paste. Make sure to spit out the water and avoid swallowing any of the mixture, as this can cause stomach irritation. After rinsing, gently brush your teeth with fluoride toothpaste to remove any remaining traces of the whitening agent. This step helps to neutralize the whitening agents and re-mineralize the enamel. Be sure to brush your teeth gently. Avoid aggressive brushing, as this can further irritate your gums and potentially damage the enamel. You can consider using a mouthwash for additional cleaning and freshening, but choose an alcohol-free formula to prevent any potential drying effects. These steps are essential to ensure that your teeth remain clean and healthy while minimizing any potential side effects from the whitening process.
Maintaining the Results
Maintaining the results of your DIY teeth whitening efforts requires a consistent oral hygiene routine and certain lifestyle adjustments. Regularly brushing your teeth twice a day with fluoride toothpaste is the foundation of maintaining a bright smile. Flossing daily is crucial for removing plaque and food particles from between your teeth, preventing staining and decay. Limit your consumption of staining foods and drinks, such as coffee, tea, red wine, and dark-colored berries. If you consume these, try to rinse your mouth with water immediately afterward to minimize their effects. Regular dental check-ups and professional cleanings are also essential for removing any stains and keeping your teeth healthy. You might consider using a whitening toothpaste as part of your daily routine. Staying consistent with these habits will help you maintain your whiter smile for a longer period and preserve the health of your teeth.
Tips for Optimal Whitening

To maximize the effectiveness of your DIY teeth whitening strips, here are some helpful tips. Ensure thorough preparation by cleaning your teeth and gums well before the procedure. Consistency is key, so adhere to the recommended frequency of treatments, usually once or twice a week. Use fresh ingredients for each application to maintain the potency of the whitening agent. Avoid using excessive amounts of the whitening paste, as it will not necessarily improve the results and may cause irritation. Be patient and realistic about the results. DIY methods often take several applications to show noticeable changes. Monitor your teeth for any signs of sensitivity or irritation and adjust your treatment accordingly. Combining the DIY method with good oral hygiene practices, like regular brushing, flossing, and dental check-ups, will help to maintain your bright smile and overall oral health. Remember, results may vary depending on individual tooth structures and the type of stains.
Alternatives to DIY Strips
If DIY teeth whitening strips do not meet your needs or expectations, several alternatives can help brighten your smile. Over-the-counter whitening products, such as whitening toothpastes, gels, and strips, offer convenient solutions. These products typically contain lower concentrations of bleaching agents and may offer more consistent results than DIY methods. For more dramatic results, you can consider professional teeth whitening treatments performed by a dentist. These treatments often use stronger bleaching agents and can provide significant whitening in a shorter amount of time. Other options include porcelain veneers and dental bonding. Veneers are thin shells that are custom-made to cover the front surface of your teeth, and dental bonding involves applying a tooth-colored resin to the teeth to improve their appearance. These methods are more invasive but can address various cosmetic issues, including staining and discoloration. Consulting with your dentist can help you determine which option is best suited for your individual needs and desired outcomes.